EcmSpy for PalmOS is an add-on to EcmSpy for Mono on the PC. The PDA software allows you to read EEPROM data from or to send EEPROM data to the ECM. The software also allows to log runtime data, to be analyzed later on a PC. The connection to the ECM can be established using a cable or wireless via Bluetooth (if supported by the PDA). A wireless connection requires a Bluetooth modem that is plugged into the diagnostic socket of the ECM. Steps involved in building a Bluetooth modem are shown here. Instructions how to build a cable are available here.
EcmSpy for PalmOS does not support direct adjustement of EEPROM data. This feature is available only for applications run on a PC.
MODIFYING YOUR ECM WILL INVALIDATE WARRANTY, COULD DAMAGE YOUR ENGINE AND IS PERFORMED ENTIRELY AT YOUR OWN RISK! IN THE U.S.A., CANADA AND EUROPE, FEDERAL LAW MAKES IT ILLEGAL FOR ANYONE TO TAMPER WITH, DISCONNECT, REMOVE OR OTHERWISE RENDER INOPERATIVE ANY AUTOMOTIVE EMISSIONS RELATED CONTROL DEVICE. IN GENERAL, THE ENTIRE FUEL SYSTEM AND ALL ITS INDIVIDUAL COMPONENTS (INCLUDING THE EFI ECM) ARE CONSIDERED 'EMISSIONS RELATED CONTROL DEVICES'. THE PENALTIES FOR TAMPERING CAN BE SUBSTANTIAL.
If you modify your ECM, you may be legally obliged to notify your insurance company. It may also be illegal in some countries to ride on the road with a modified ECM. It should also be stated that modifying your ECM will certainly void your manufacturer's warranty! All numbers shown in lists, tables and maps are purely fictious and MUST NOT be applied to any existing bike.
Download and expand the archive containing all required files: the application ("EcmSpy-BT.prc") and the various databases ("ID07_tblBits.pdb", "ID07_tblMaps.pdb", "ID07_tblOffsets.pdb", "ID07_tblPages.pdb"). Licensing terms can be found in "gpl.rtf" and "gpl.txt".
To copy application and databases to the PDA start the "Palm Desktop" application on the PC and open the install tool (named "Quick Install", "Install" oder "Install Tool" depending on your desktop application's version).

Palm Installations-Tool
Drag and drop all files to copy to the PDA into the install tool or chose the files from a file selector box. Close the install tool and start a Hotsync on the PDA. This will copy all selected files to your PDA. Once the Hotsync has finished, tap the EcmSpy-BT icon on the PDA to start the application.
The overview will be shown after every start of the application. As the application is not yet connected to an ECM all entries are still empty.
At the bottom of the screen are two selections, which will define the protocol and connection type used.

|
|
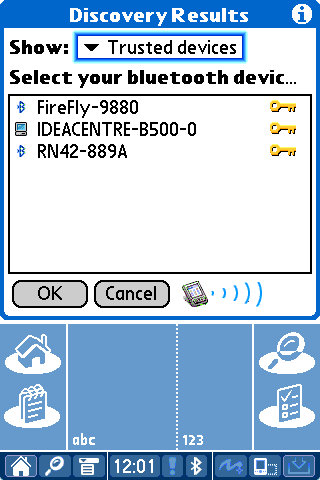
Tap the "Connect" button to connect to the ECM. When a wireless Bluetooth connection had been chosen, a selection box will pop up showing all available Bluetooth devices. Select your Bluetooth modem and tap "OK" to confirm the selection.
As soon as the connection is established, the ECM type will be queried. If the ECM is supported by this application the details will be filled in.

|
|
To run an operational test for the various actuators (coils, injectors etc.) select "Active Tests" from the menu. This screen will also allow to reset the TPS.

A TPS reset is required only for ECM of type DDFI or DDFI-2 (all models before 2008) if the throttle position sensor voltage with a fully closed throttle differs from the voltage stored in the EEPROM. The TPS zero voltage can be checked easily using EcmSpy for Mono. ECM of type DDFI-3 do not require a tool to perform a TPS reset, please refer the service manual for instructions.
Select a device and hit the "Start" button to start a test cycle. If the engine is running or the device is not present or not supported by the firmware, an error message will appear. Otherwise a message will pop up while the device test is running.

|

|
Error message |
Test running |
Click image for an unscaled view |
|
The ECM will not send a feedback when the test finishes, it's in the responsibility of the user to check the device for proper function while the test is running.
To watch runtime data the menu items "Data Bars", "Data Channels" and "Data List" offer several different views depending on the user's need.

|

|

|
Bar view |
Numerical view |
List view |
Click image for an unscaled view |
||
The list view will display all available data (except bitvalues) in a scrollable list, for the bar view and the numerical view up to four variables need to be chosen from the dropdown lists. Hit the "Start" button to start the data query from the ECM.
Recording runtime data is very helpfull for chasing down errors that occur while riding. Select "Data Log" from the menu to record runtime data for later evaluation with EcmSpy for Mono or the MegaLogViewer software, which is a very powerfull tool.

|

|

|
Data Log Screen |
Recording |
Data Log Finished |
Click image for an unscaled view |
||
After the page has been opened, it's is almost empty except a progress bar at the top, indicating the free space on the storage used to save log files to. The storage used by the EcmSpy application is always the first one attached to the system. PDA, that have internal storage available, such as Tungsten T5 for example, will save log and data files there, all other PDA types require a memory card installed. Log files are not very large, an hour's log will not exceed 2 megabytes.
To start recording runtime data tap the "Start" button. The free space in the center of the screen will now show the current load ("TPS") and engine speed ("RPM") as sent by the ECM. For ECM type that support separate load values for the front and rear cylinder (e.g. 1125 Helicon engines) the rear load value is displayed. The recording is stopped by hitting the "Stop" button and the filename (namimg scheme is: "YYYY-MM-DD_hhmmss.bin") as well as the number of stored records will be shown now. Defective records, cause by electric noise or transmission errors, will be identified automatically and silently discarded without further notice.
All runtime data will be stored in binary form, unmodified and as sent by the ECM. This approach results in smaller data files and requires less CPU power, allowing a higher sampling rate. To watch or analyze runtime data with a spreadsheet application or the MegaLogViewer software on the PC, binary files need to be converted to text files before. This could be done with the "Bin2Msl" tool, available from the tools page at the ecmspy.com website.
When the engine lamp is lit and indicates that a trouble code is present, select "Diagnostic Code" from the menu to read the trouble code off the ECM.

Trouble Codes
Tap the "Read Errors" button to retrieve the trouble codes from the ECM. The trouble codes will be interpreted by the EcmSpy application and displayed as a clear text message, to aid troubleshooting. To clear a stored error hit the "Clear Errors" button. Current errors will clear automatically as soon as the fault cause is fixed and the ignition is toggled.
EEPROM data is managed with the help of an internal database, which is an integral part of the EcmSpy application. To access the database, select "EEPROM Copy" from the menu. EcmSpy for PalmOS knows three storage locations for EEPROM data, which can serve as a source or a destination when moving EEPROM data:
The database is the pivot point of EEPROM data handling on the PDA. Data can be read from a file or fetched out of an ECM, or can be written to a file or burned into an ECM once they are stored inside the database.

|

|
Database View |
Actionbuttons |
Click image for an unscaled view |
|
The database view (marked red in the left image above) shows EEPROM data already stored in the database, imported from file or fetched from an ECM.
As soon as a record is selected in the database view, action buttons appear as shown in the right picture.

|

|

|

|
Click image for an unscaled view |
|||
|
Export EEPROM data will be saved in a file on a memory card or in the internal storage of the PDA. The file can be found in the ECMSPY folder, created in the root directory of the storage. |
Burn The selected data will be burned into the ECM. |
Info This action button opens an info box, showing the ECM type, the data size and a small remark, which can be edited to hold information about changes applied or similar. |
Delete Deletes the selected EEPROM data from the database. Please note: deleted data can not be recovered. |
To load EEPROM data into the database, they need to be imported from a data file or fetched from an ECM.

Add EEPROM Data
Tap the "Import" button to read data from a file, stored on a memory card or the built-in storage, or the "Fetch" button to download EEPROM data from the ECM.

|

|

|
|
Click image for an unscaled view |
|||
|
Import File selector for choosing a EEPROM data file. |
Fetch Downloading EEPROM data from an ECM, showing the transmission progress. |
Remark Each EEPROM data record is linked to a short note, that can be edited. |
|
By default the PDA switches itself off after a short time (max. 3 minutes) to save battery power. This is too short to record a significant log. There are several tools available, like "AutoOffExtender" or "AlwaysOn", which allow to extend this time. Wireless communication and writing to a storage card draw a lot of power from the battery, therefore the battery often lasts no longer then 2 hours and needs to be recharged.
PDA of type Tungsten T5, that contain a built-in storage, can serve as a USB disc when connected to a PC and allow easy file transfer. Connect the PDA to the PC using a USB hotsync cable and start the "Drive Mode" application on the PDA. The internal storage will then show up on the PC like an external drive or memory stick.